
Strength Training for Real Life: The ARVAmethod Blueprint
Fitness has to work in the context of your actual life—not some idealized version of it. Obsessing over the gym, hobby-horsing in your comfort zone, or fantasizing about your perfect routine and body doesn’t lead to better health. But, understanding your needs, training at your skill level, and planning for progress does. This is where most people get confused and frustrated.
I know you have heard the hype from podcasters and influencers about training harder, following some exiting new program, and obsessing over data points instead of listening to your body. But, there’s a simpler, more effective way to approach fitness: set clear, realistic training targets that match your schedule, your body, and your goals. When you know what you're working toward—and how much is actually enough—you can stop second-guessing every workout and start building a body that feels strong, resilient, and capable. This kind of training works at any age, for any skill level, because it’s based on principles that scale with you.
In this article, I’m going to show you how to set those targets, structure your workouts, and make consistent progress without burning yourself out or falling into the all or nothing mindset. This is about training smart, not extreme. It’s the method I’ve built over two decades of working with real people in real life—and I know it works because I’ve watched it transform bodies, confidence, and lives from the inside out.
This is the ARVAmethod Blueprint to training effectively at every age and skill level. It is the formula that I apply to my Build PATH Coaching Program that shifts my clients whole perspective of holistic health and fitness, gets results, and puts them back in control.
What You’ll Find in This Article
✅How much you need to train, at least and at most, for results
✅ How to set your training targets for progress
✅ How to apply progressions to make gains and avoid plateaus
✅ How to structure a solid, effective workout at any skill level
✅ Key recovery techniques to stay injury-free, support your body, and actually see results
This article isn’t just information—it’s a full guide you’ll want to come back to over and over again whenever you need to reset, refocus, or refine your fitness routine.
Let’s go.
How Much Training Do You Actually Need?

Let’s be clear: when it comes to strength training, more isn’t always better. There are a few basic requirements that are non-negotiable—and the good news is, they’re realistic and doable for most people. There’s also an ideal training schedule that supports real progress without taking over your life. Sure, competitive athletes need more volume and more precise programming—but for you, and for anyone who wants to be strong, healthy, and capable through all of life’s transitions, I’m going to show you exactly what you need to do—and how surprisingly simple it can be.
Minimum Training Schedule For Health
Unless you’re injured or sick, you need to make time for your health and your body. And in all honesty, if you can’t carve out 2 - 3 hours in your entire week to take care of yourself, then something in your life has to change. That said, when you are only able to meet your minimum requirements, how you train become critical to ensure you are making the most of your limited time.
Strength Training: 2 sessions per week (about 60-70 minutes each)
Start with 10 minutes of mobility to warm up.
Focus on full-body workouts that include 6-8 exercises (calisthenics and home equipment count if that’s all you have access to).
Add a 10 minute HIIT after lifting.
Finish with 10 minutes of stretch and breathing to relax and reduce tension.
Zone 2 Cardio: Aim for 150 minutes per week, accumulative (This is your basic NEAT, not a gym workout.)
Brisk walks, taking the stairs, carrying groceries, playing with your kids or pets for a total of about 30 minutes per day, over the course of the day.
If needed, supplement with 1–2 short sessions (30–40 minutes) on a treadmill, bike, or incline walk.
The best way to meet your zone 2 target is to move more often with more intensity.
Quick note on Zone 2 Cardio
One thing I want to say that goes against a lot of what you’re hearing in mainstream fitness circles is that Zone 2 is not a workout. It’s a baseline for human health. The reason Zone 2 is such a buzzword right now isn’t because it’s cutting-edge training; it’s because we’ve become too sedentary. Most people sit more than 6 hours per day. Even those who hit the gym regularly are often inactive the rest of the time, and that lack of daily movement has serious health consequences.
Zone 2 training refers to maintaining a heart rate of roughly 60–70% of your max heart rate, which for most adults falls somewhere between 113–131 beats per minute (BPM). It’s a low-intensity state that improves metabolic function, mitochondrial efficiency, and cardiovascular health. But the key is: you don’t need a treadmill to get there.
You enter Zone 2 anytime you’re moving in a way that’s a little more demanding than your comfort zone—carrying groceries, walking briskly, taking stairs, doing chores, dancing, gardening, even playing actively with kids or pets. If it gets your heart rate slightly elevated and keeps it there for more than a few minutes, you’re doing it right.
The goal is to accumulate 150 minutes of Zone 2 activity per week, and yes—it can be broken up. Five minutes here, ten minutes there—as long as you’re consistently moving, it adds up. In fact, research shows that accumulated movement throughout the day is often more effective for improving insulin sensitivity and lowering chronic disease risk than a single bout of structured cardio (Duvivier et al., 2013).
Longer sessions of steady-state movement (like 30–40 minute walks or bike rides) are great if you enjoy them—but please don’t swap out your strength training for this if your time is limited. Zone 2 supports your health. Strength training builds your foundation.
Ideal Training Schedule For Progress
If your goal is to build muscle, lose body fat, improve how you move, and feel confident in your body at any age, then you should be aiming for this ideal training schedule. A lot of people still believe they need to train every day and push to their limits in every session—but that’s a fast track to burnout, injury, and stalled progress.
And hers one myth I want to bust: you can’t “make up” for lost time in the gym. If you’ve been out for a while, coming back with high volume and intensity won’t get you further—it’ll just set you back. A good rule of thumb: it takes about half the time you took off to get back to your previous strength levels. So if you were deadlifting 125 lbs and took three weeks off (which I don’t recommend unless you're sick or injured), it will take about 1.5 weeks of consistent training at 60–70% of your last load to rebuild.
And if you’re over 60? That timeline matches the time you took off. The older you get, the faster your body loses strength, power, and endurance—which is exactly why consistency matters more than intensity. Skipping workouts isn’t an option. But training doesn’t need to take over your life either. There’s a smarter, more balanced way to do this—and I’m going to show you exactly what it looks like.
Strength Training: 4 sessions per week (50–60 minutes each)
Start with 10 minutes of mobility to warm up.
Focus on full-body workouts that include 6-8 exercises (calisthenics and home equipment count if that’s all you have access to).
Finish with 10 minutes of stretch and breathing to relax and reduce tension.
HIIT: 2 short sessions per week (12–20 minutes)
Sprint intervals, bike sprints, bodyweight circuits, or sled work.
Add a 10 minute HIIT interval after lifting.
Zone 2 Cardio: 150 minutes per week
Still coming mostly from daily active living—walking, stair climbing, chores, errands.
Add 1–2 longer sessions if needed to hit your target.
Let’s Talk About HIIT
There’s a lot of hype around high-intensity interval training (HIIT), but like Zone 2, it’s often misunderstood and misapplied. HIIT is a tool—not a training plan. It’s meant to challenge your cardiovascular system, build anaerobic capacity, and train your fast-twitch muscle fibers through short, intense bursts of effort followed by recovery. The key word here is recovery. True HIIT requires you to push hard for a short period—usually 20 to 40 seconds—then allow your heart rate to come back down before repeating. If your heart rate never drops during a session, or if you’re grinding through 30 minutes without rest, you’re not doing HIIT—you’re doing steady-state conditioning in disguise.
Most people overuse HIIT or try to turn every workout into a high-intensity effort. That’s a mistake. This kind of training puts a lot of stress on your nervous system, joints, and recovery capacity. It’s not meant to be done daily, and it should never replace strength training. At most, one to two sessions per week is plenty, and those sessions should be short—no more than 12 to 20 minutes after a proper warm-up.
You can perform HIIT using sprints, cycling, rowing, sled work, or bodyweight movements like jump squats or burpees, but the most important thing is that the effort is high and the recovery is real. HIIT works best when it’s added to the end of a strength workout or done on its own day with plenty of rest on either side. And like all training, it should scale to your fitness level—if you’re new to exercise, trying to “go hard” without a base of strength, mobility, and control will do more harm than good.
When used correctly, HIIT can improve cardiovascular health, insulin sensitivity, and VO₂ max. But it’s not magic, and it’s not a shortcut. It’s a specific type of effort with.
How to Set Your Training Targets for Progress

Getting workouts in is great—but if you want results that last, you need more than just movement. You need a plan that helps you make progress. And that starts with setting the right training targets for your body, your goals, and your real life.
The biggest mistake I see? People either push too hard without a strategy, or coast through workouts without enough challenge or progression. Neither approach leads to long-term change. Progress comes from knowing what you’re working toward, choosing the right level of difficulty, and making small adjustments over time that your body can actually adapt to.
That’s where training targets come in. These are the benchmarks and guidelines that help you know what to do, when to push, and how to grow stronger, leaner, and more capable without overtraining or spinning your wheels. This is also where a good personal trainer comes in handy, but you should understand this critical aspect of effective training for yourself.
Start With a Self-Assessment (Your Body Tells You What It Needs)
Before you dive into a new training program—or even return to the one you’ve been doing—you need to check in with your body. This doesn’t mean obsessing over numbers or performance. It means assessing your foundation: movement, control, and how your body handles load.
Self-assessment helps you train smarter. It shows you what needs work, where you’re strong, and what areas might be setting you up for injury if left unchecked. And if you’ve been away from the gym, are coming back from illness or injury, or just feel like something’s “off,” this step is essential. Think of it like a pre-flight checklist for your body.
The 5-Minute Bodyweight Check-In
These aren’t fancy tests—just basic, functional movements that tell you a lot about your current mobility, stability, and control. All of these should feel smooth, stable, and pain-free when done slowly and under control with just your bodyweight.
Here’s what to do:
✅ Squat
What to check: Can you lower to a comfortable depth with heels down, knees tracking over toes, and chest upright?
Common issues: Heels lift, knees cave in, torso collapses, low back tucks or arches excessively.
If it’s off: Work on ankle mobility, hip opening, and bodyweight tempo squats before loading.
✅ Lunge (or split squat)
What to check: Can you step forward or back and lower with control? Are your hips level and knees stable?
Common issues: Wobbly knees, leaning torso, pushing off unevenly, heel lifting on front foot.
If it’s off: Start with stationary split squats, wall support, or reduce the range of motion.
✅ Step-Up
What to check: Can you step up and down with control and even effort on both sides?
Common issues: Pushing off the bottom foot instead of lifting with the working leg, wobbly knees, using momentum.
If it’s off: Lower the step height, slow it down, and pause at the top to control balance.
✅ Plank
What to check: Can you hold a straight line from head to heels for 30–60 seconds without sagging or arching?
Common issues: Hips drop, shoulders shrug, breath is shallow or holding.
If it’s off: Reduce the time, elevate the surface (hands on bench), or work on breathing mechanics.
✅ Push-Up
What to check: Can you lower your chest toward the floor with control, keeping your body in a straight line?
Common issues: Elbows flare out wide, hips sag, neck juts forward, or you collapse at the bottom.
If it’s off: Start with incline push-ups or eccentric-only reps (lowering slowly to the floor).
🔁 Make It Routine
This isn’t a one-time thing. You should check in with these movements every few months, or anytime something feels off in your training.
Even seasoned lifters should be able to move well with just their bodyweight. If you can’t—don’t rush into loading or layering complexity. Regress the movement, improve your mobility and control, then build from there.
Bodyweight self-assessments are a simple way to check your alignment, joint health, and movement efficiency. They take just a few minutes and can save you months of frustration, plateaus, or even injury down the line.
Choose the Right Training Focus
Here’s a quick cheat sheet for what to prioritize based on your current goal:
If you’re new or returning after a break: Focus on stability, control, and foundational movement patterns. Keep your reps moderate (8–12), use light-to-moderate weight that you could do more reps with, and emphasize tempo (3 second to contract, and 3 seconds to release), 2-3 sets.
If your goal is hypertrophy (muscle building): Use moderate weight for 8–12 reps, train close to failure (1–2 reps left in the tank), and aim for 3–4 sets per movement.
If your goal is strength: Use heavier loads in the 4–6 rep range with longer rest (90–120 seconds). Focus on compound lifts like squats, deadlifts, rows, and presses.
If you want fat loss or recomposition: Focus on progressive overload with hypertrophy-style strength training while maintaining a moderate calorie deficit from your TDEE, and increasing daily movement.
How to Progress Without Burning Out
Once you’ve checked in with your body and know what you're working with, the next step is to decide what you’re training for. Your training focus will determine your rep range, rest time, exercise selection, and even how much weight to use. If you skip this step and just pick random workouts, you may be moving—but you’re probably not progressing.
So ask yourself: what’s your goal right now?
Do you want to build lean muscle?
Get stronger and feel more capable?
Improve your endurance and movement efficiency?
Are you just trying to get back into the groove after time off?
Whatever your goal, picking the right rep range and training strategy will help you get there faster—and without wasting time or burning out.
🎯 What Each Rep Range Trains Best
Use this as a general guide:
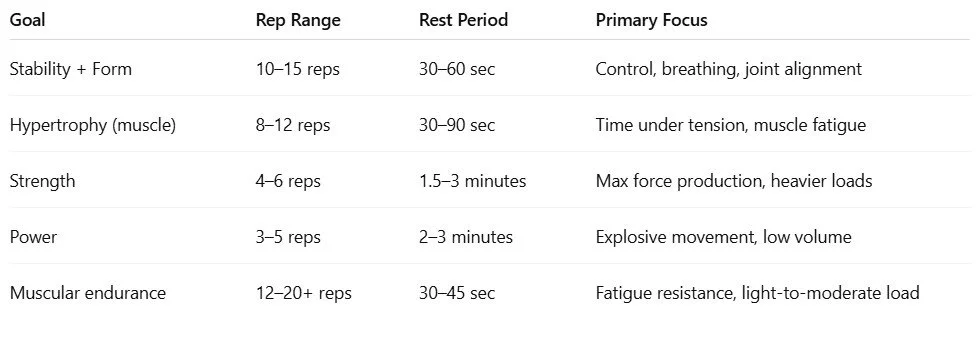
There’s overlap, and you don’t have to live in just one range forever. But sticking to a focused rep scheme for 4–6 weeks allows your body to adapt and your training to build on itself.
🏋️ How to Pick the Right Weight
Your working weight is the amount of resistance you can move with good form, full range of motion, and control for the number of reps in your target range—while still leaving 1–2 reps in the tank (RPR - reps on reserve), and not going to full failure.
Here’s a simple way to find your working weight:
Start light and build up slowly. Your first set is a warm-up and a test.
By the final rep of your working set, you should feel challenged—but not sloppy.
If you could do more than 2 extra reps at the end, increase the weight slightly next time.
If your form breaks, or you’re straining by rep 4 of a 10-rep set, it’s too heavy.
Example:
If you’re doing goblet squats for 10 reps and rep 8 feels hard but steady, and rep 10 slows you down a bit without making your knees cave or your back round—you’re at the right weight.
If you hit rep 10 and could do 5 more? Too light.
If you bail at rep 6 or your form breaks? Too heavy.
✅ A Few Tips to Stay in the Zone
Use tempo: Slowing down your reps (especially the lowering phase) increases challenge without increasing weight.
Track your lifts: Keep a simple log of your reps and weights so you can see progress and plan adjustments.
Prioritize form over ego: If you’re compensating with momentum, other muscles are taking over—and that’s not the goal.
Don’t progress every lift every week: You don’t need to overload every movement. Focus on your main lifts (like squats, deadlifts, rows, and presses), and keep accessory work stable until it gets easy.
You don’t need to chase PRs every week. You need to show up, train with intention, and let your strength build over time. The goal is to work just hard enough to challenge your body—not crush it.
How to Apply Progressions to Make Gains and Avoid Plateaus

If you’re training regularly but not seeing results, chances are you're missing one key piece: progression. Your body adapts to stress—so if your workouts never change, your progress eventually stops. On the other hand, if you try to progress everything all the time, you end up overwhelmed, injured, or just plain exhausted.
Progressive overload is how your body gets stronger, leaner, and more capable over time. But it has to be intentional and strategic—not just random increases in weight or volume.
What Progression Actually Means
Progression isn’t just about going heavier. You can make gains by increasing reps, sets, time under tension, range of motion, or improving form. These changes challenge your system in new ways, encouraging adaptation without constantly maxing out.
Here’s how to do it practically:
Pick 2–4 key compound lifts (like squats, deadlifts, overhead presses, or rows) as your progression anchors.
Track your weight, reps, and effort for those movements.
Every 1–2 weeks, aim to:
Add 5–10 lbs if form and reps feel strong
Add 1–2 reps per set
Slow your tempo (especially the lowering phase) to increase time under tension
Keep your accessory work (isolated exercises) stable until it feels too easy—then adjust reps or sets.
You don’t need to progress every exercise in every session. Focus your progression efforts on the big lifts where gains matter most and use accessory work to support and stabilize.
Know Your Limits (and Why That’s a Good Thing)
There’s a ceiling on how much you can progress week to week. Chasing linear gains for too long leads to stalls or burnout. That’s why cycling your training focus is one of the best ways to keep improving long-term.
Think of your training in 6–8 week blocks, where each block has a specific goal:
Hypertrophy phase: Focus on muscle-building with moderate weights and higher reps (8–12), slower tempo, and shorter rest.
Strength phase: Lower the reps (4–6), increase weight, and lengthen your rest periods. These sessions are heavier but less overall volume.
Power phase: Add explosive lifts like kettlebell swings, jump squats, and sled pushes to train speed and muscle reactivity (3–5 reps with high intent and lots of rest).
Weak-point cycle: Choose 1–2 movements or muscle groups that lag behind (like pull-ups or single-leg stability), and prioritize them in your training for a cycle.
Each cycle challenges your body differently and gives you a new goal to work toward. This keeps training interesting, focused, and sustainable. You can do this cycling continuously so that you always have a goal for your training, and it never gets boring.
When to Switch It Up
You should consider changing your training phase when:
Progress stalls for 2–3 weeks
You feel bored or unmotivated
Recovery feels harder than usual
You're not seeing changes in performance or muscle quality
Switching doesn’t mean starting over—it means applying a new stimulus so your body keeps adapting. This also reduces your risk of injury and avoids chronic overuse patterns that come from doing the same thing for too long.
Example: 6-Week Hypertrophy Progression Phase
If your goal is to build lean muscle, sculpt your physique, and increase strength endurance, then a hypertrophy-focused training phase is exactly where you want to start. This 6-week example is designed for real life—3 to 4 days per week of training with flexible structure and realistic progress.
This approach keeps things simple, sustainable, and effective while building noticeable results.
Weeks 1–2: Lay the Foundation
The first two weeks are about establishing good form, building volume tolerance, and priming your body for muscle growth.
Training Focus: Full-body workouts, moderate loads, clean tempo
Reps & Sets: 3 sets of 8–10 reps
Tempo: 2–1–2 (2 seconds down, 1 second pause, 2 seconds up)
Rest: 45–60 seconds between sets
Effort: RPE 7–8 (leave 2 reps in the tank)
Sample Compound Lifts: Goblet Squat, Romanian Deadlift, Incline Dumbbell Press, Bent-Over Row
Sample Accessories: Step-ups, Lateral Raises, Cable Curls
Weeks 3–4: Increase Volume and Tension
Now that your body is adapting, it’s time to increase volume and time under tension. This stimulates more muscle growth and helps you build endurance under load.
Training Focus: Slightly higher reps and slower tempo
Reps & Sets: 3–4 sets of 10–12 reps
Tempo: 3–1–2 for deeper time under tension
Rest: 45 seconds between sets
Effort: RPE 8 (just 1–2 reps shy of failure)
Optional Change: Swap 1–2 accessory moves with similar variations (e.g., walking lunges instead of step-ups).
Weeks 5–6: Add Intensity Without Burning Out
This is where you challenge yourself. Increase weight slightly on your main lifts, push closer to failure, and add light intensity techniques like supersets or drop sets—but keep form and recovery your top priorities.
Training Focus: Intensity without grinding
Reps & Sets: 3–4 sets of 8–10 reps
Intensity Tools: Drop sets, tempo holds, or supersets for accessories
Effort: RPE 8–9 on compound lifts
Reminder: Your form should never suffer just to chase more weight. The real goal is building quality muscle that performs well and protects your joints.
Progress Tracking Tips
Keep a simple training log: note weights, reps, and how each lift felt.
Pick 2–3 anchor lifts to track closely (e.g., squat, row, press).
Watch for signs that it’s time to progress: reps feel easy, recovery is fast, form stays sharp.
Why 6 Weeks Works
Six weeks is long enough to see real results—but short enough that you can adjust, change focus, or enter a new phase (like a strength or power cycle) before burnout or boredom hits.
Hypertrophy is about consistency, smart progression, and showing up with intent—not chasing soreness or PRs. Train smart, track your progress, and remember that rest and nutrition matter just as much as what you do in the gym.
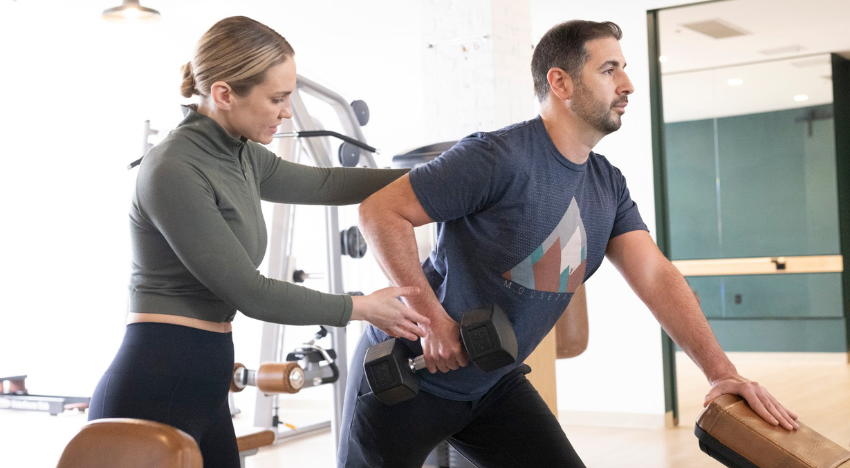
How to Structure a Solid, Effective Workout at Any Skill Level

Let’s be honest—this is where most people (and a lot of influencers with no real-world coaching experience) start to lose the plot. A good workout isn’t just about breaking a sweat or following a random list of moves from Instagram. It’s about training with purpose, using exercises that work with your body’s natural mechanics, and progressing over time in a way that protects your joints, builds strength, and supports your long-term goals.
A well-structured workout follows a formula—and once you know it, you can plug in exercises that match your needs, your space, and your available equipment. Whether you’re a beginner or highly trained, the foundation doesn’t change.
Understanding Exercise Types & Body Mechanics
Most strength-based movements fall into one of six fundamental patterns, each tied to how your body naturally moves. When you structure your workout around these, you’re training your whole body efficiently, reducing risk of overuse or imbalance, and building functional strength that carries into real life.
The 6 Movement Patterns
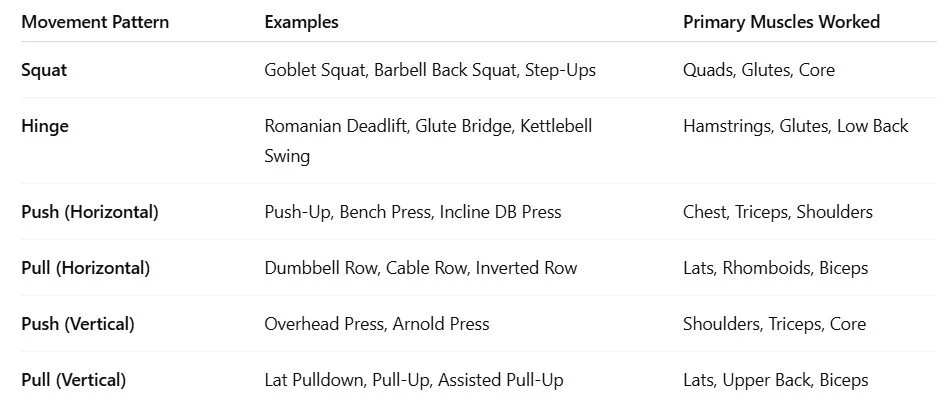
You don’t need to do all six every session, but your weekly plan should include some variation of each pattern to keep your body balanced and strong.
Types of Exercises: Compound vs. Isolation
Understanding compound vs. isolation movements will help you prioritize what to do first in your workouts—and what to use to support those big lifts.
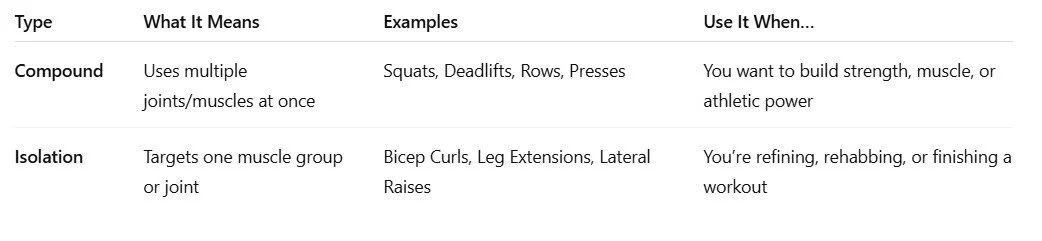
Compound exercises are your main course—they demand more energy and deliver more results. Isolation moves are your side dishes—useful for support, balance, or working on weak links.
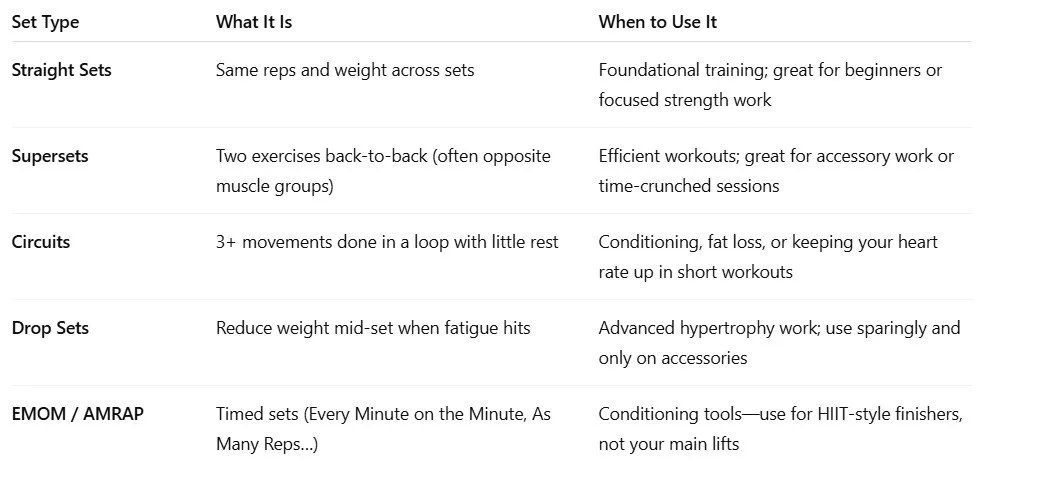
Types of Sets: What to Use and When
The way you organize sets matters. You don’t need to make every workout a science project, but understanding a few types of sets can help you make your training more effective—and less boring.
The ARVAmethod Workout Blueprint
Here’s the basic framework I use with clients of all levels—whether we’re in a gym, working at home, or rebuilding after injury. It balances movement, nervous system prep, strength, and recovery.
Follow this blueprint, and make progress
Mobility + Activation (10 - 20 min) - Wake up your joints, turn on stabilizing muscles, and prime your nervous system.
Example: cat-cow, deep lunge with rotation, banded glute bridges, shoulder CARs
This doesn’t have to be overly structured, and should just focus on moving the body, through full range, with intentions, all joints
Main Lifts (3–4 exercises, compound focus) - Based on movement patterns: squat, hinge, push, pull
3–4 sets of 6–12 reps depending on goal (strength vs. hypertrophy)
Accessory Work (2–3 isolation or core-focused moves) - Address weak links or add volume without heavy stress
Examples: RDL to curl, lateral raises, bird dog rows, reverse lunges
Optional Finisher: HIIT or Core Superset (10–12 min) - Short burst of high effort, or a core circuit
Example: 30s on/30s off of mountain climbers, sled pushes, jump squats, or plank-to-pushups
Cool-Down + Stretch (5–10 min) - Downregulate the nervous system, reduce soreness, improve recovery
Focus on breathing, long holds, and relaxing the spine and hips
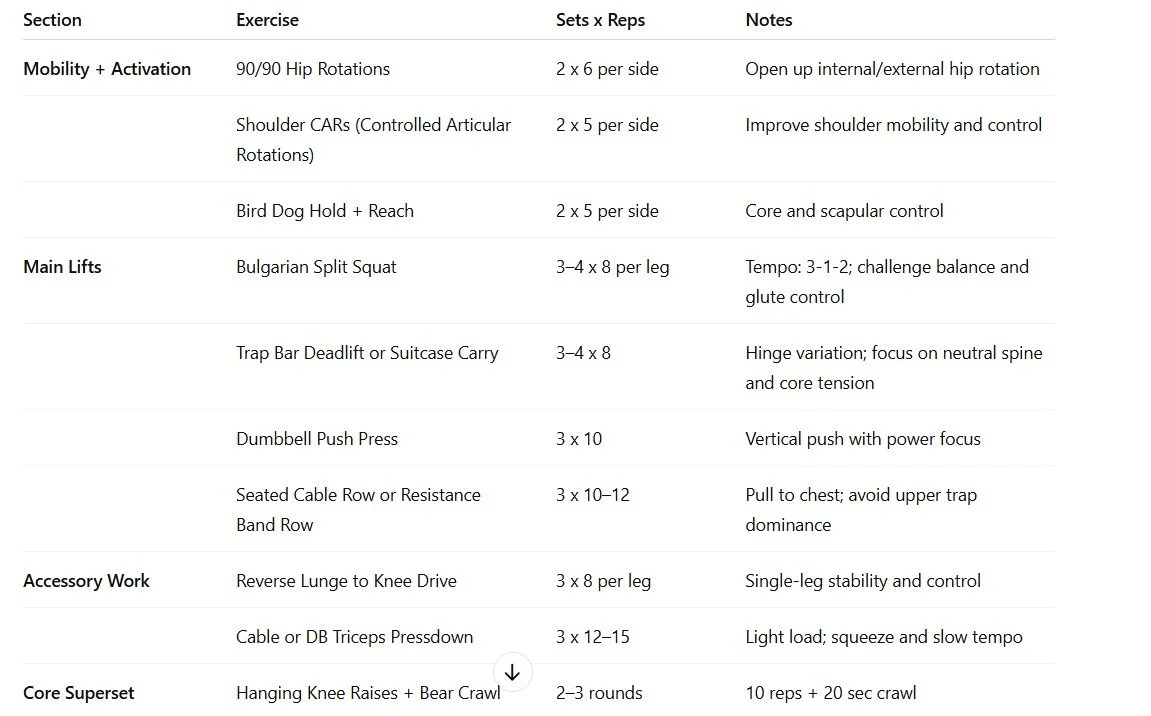
Sample workouts using the ARVAmethod Blueprint
🏋️♀️ Full-Body Hypertrophy Workout — Day 1

🏋️♀️ Full-Body Hypertrophy Workout — Day 2


Key Recovery Techniques to Stay Injury-Free, Support Your Body, and Actually See Results
You don’t get stronger while you’re training—you get stronger while you recover.
It’s one of the most overlooked truths in fitness, and yet it’s where most people stall. They either push too hard, skip recovery altogether, or don’t realize that things like sleep, hydration, and stress play a huge role in what happens in the gym. Your muscles need stimulus to grow—but they also need space to repair, rebuild, and adapt. And without recovery, there is no progress.
Recovery isn’t just about taking rest days (though yes, you need those too). It’s about giving your body the tools it needs to regenerate and your nervous system the time it needs to reset.
🔑 The Non-Negotiables of Recovery
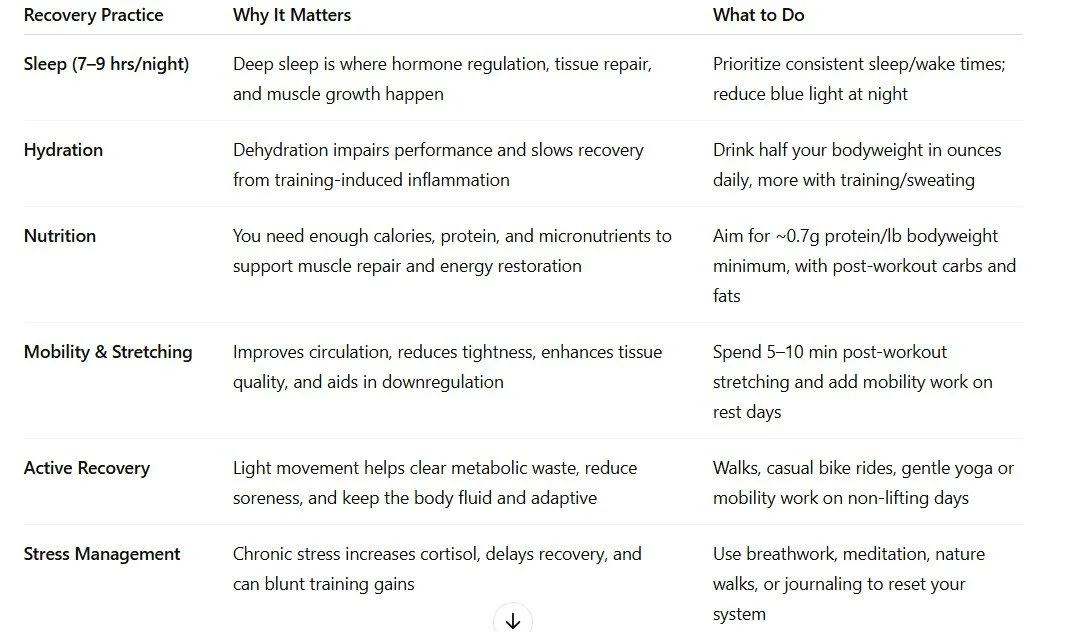
🧠 How to Know You Need More Recovery
Listen to your body—because it will always tell you when you’re out of balance. If you’re checking all the training boxes but still feel drained, it’s not a motivation issue—it’s likely a recovery one.
Look for these red flags:
You feel more sore after normal workouts
You’re getting weaker, not stronger
You start getting injuries and pain that won’t go away
Your sleep quality tanks
You start feeling anxious or irritable for no clear reason
You get sick more often or have lingering inflammation
You dread your workouts (and not just because they’re hard)
These are signs that your load (physical and emotional) has outpaced your capacity. It’s time to pull back slightly—reduce volume or intensity, prioritize sleep, revisit your nutrition, and support your nervous system. This isn’t weakness—it’s strategy.
🛠 Tools That Can Help (But Aren’t Magic)
These tools can support your recovery—but they don’t replace the fundamentals:
Foam rolling: Helps with blood flow and tissue quality
Cold exposure (post-exercise): Can reduce soreness—but may blunt gains if overused
Sauna: Great for circulation, cardiovascular support, and muscle relaxation
Sports Massage therapy: Promotes circulation and downregulation (especially if you’re carrying tension)
Breathwork or guided rest: Helps regulate the nervous system post-training or before sleep
Remember, these are enhancers—not essentials. If you’re not sleeping, eating enough, or managing stress, no tool is going to save your gains.
The Recovery-Progress Loop
Recovery is the bridge between effort and adaptation. You train → you recover → you adapt → you level up. Ignore any part of that cycle, and your progress will stall—or worse, you’ll get injured.
In Build PATH, I help clients not only train smarter, but recover smarter. We track readiness, structure your week to support both growth and rest, and ensure that your body gets stronger—not just more tired. Because sustainable progress means knowing when to push and when to pull back.
And knowing that sometimes, the most powerful thing you can do for your health and strength… is rest.
Making it work for you
Let’s keep it simple. If you remember anything from this guide, let it be this:
✅ The ARVAmethod Real-Life Fitness Checklist
Make sure you hit your weekly minimum of training, but aim for your ideal
Don’t waste precious gym time on Zone 2 cardio, be more active through the day
Set clear training targets and cycle your training for best results
Apply progression wisely with with intention
Structure your workouts using the ARVAmethod Blueprint
Listen to your body and make time for rest and recovery
You don’t need extremes. You need consistency.
If this is the first time someone’s told you that—you’re not alone. Most people are taught to hustle harder, push through pain, or start over every Monday. But that’s not how progress works. Real, sustainable change happens when you train smarter, move better, and trust the process.
🧠 Something to Think About
The body you’re living in right now? It’s the only one you get. And how you train it—not just how much—will determine what kind of life you get to live in it. Your strength, your energy, your confidence… all of it is shaped by how well your training supports you.
Why Coaching > Personal Training
Another point I want to make is why I’ve shifted from personal training to real-life coaching. Personal training helps you work out better. Coaching helps you live better. It doesn’t just meet you in the gym—it meets you in your everyday life. Coaching teaches you how to become more aware of your body, your needs, and your health—and how to meet those needs with confidence, even when life throws you off course. Because let’s be real: it’s not hard to stay on track when everything’s going smoothly. The real challenge—and the real transformation—happens when things change. That’s where coaching makes the difference.
With Build PATH, I don’t just hand you reps and sets. I teach you how to structure your workouts, adjust them when life throws curveballs, understand your body’s signals, and stay consistent even when motivation dips. We also take a look at your eating habits, and your mindset to make lasting improvements in your overall wellbeing that grow with you.
It’s not about pushing harder—it’s about knowing where to focus, how to pivot, and what’s worth your time and effort.
If you're ready to stop spinning your wheels and finally build a routine that sticks, click here to learn more about Build PATH.
Let’s train smarter. Let’s build something that lasts.